1. Getting Started: Part I#
FS One is now SeligSIM 2024
If you are going to download the latest version of the simulator,
it is now SeligSIM 2024 after the name change. You can download this
new version from the new site and user manual below:
https://www.seligsim.com
https://www.seligsim.com/manual
If you use FS One® V1 or V2, then the setup mainly follows what you already know.
Install FS One plus the FS One update and any DLCs (Downloadable Content packages) as Administrator using mouse right click.
If you are not using FS One V1 or V2 gear, setting up a controller for the first time with any new flight simulator can be challenging and take 30 mins or so. To help make it go smoothly, the instructions below go step-by-step and depend on what controller you use.
FS One does not include axis remapping features inside the simulator. Instead, remapping can be done inside some transmitters or else with PC software (vJoy and Joystick Gremlin).
Once you have your remapping done (whether inside your Tx or with vJoy + Joystick Gremlin), you can fly every airplane in FS One without changing your remapping setup.
If you use an RC transmitter with channel/Rx reassignment ability (remapping) and direct joystick support (having 8 axes), you will not need vJoy and Joystick Gremlin installed. See the “Approach 4” below, while still reviewing this full page of instructions. Transmitters with channel reassignment ability include the Spektrum® NX series, many OpenTX radios (e.g. on FrSky) and others.
I will use Joystick Gremlin. What is it?: Joystick Gremlin creates and uses a remapping profile that sends, say, your rudder input to the proper rudder axes used by FS One, and so on for all 8 axes. You will run Joystick Gremlin at the same time that you run FS One.
Controller Setup with Joystick Gremlin: Install the simulator, vJoy, and Joystick Gremlin. Setup a vJoy device once and run Joystick Gremlin to create the remapping profile that takes your controller inputs and remaps them into the FS One standard axes order.
Instructions for installing vJoy and Joystick Gremlin are provided in the several how-to pages for various USB controllers. Every how-to page with setup instructions has the same vJoy and Joystick Gremlin “prerequisites” writeup. So pick the case that best applies for your controller.
If you have a version of the RealFlight® InterLink® simulator controller, you can download the Joystick Gremlin remapping profile (file) and load that profile into Joystick Gremlin. In that case, you do not need to create your own remapping. Instead, in Joystick Gremlin load the profile (from the instructions page) and use the swap devices (
Actions -> Swap Devices) menu item to assign the profile to your InterLink controller on your computer. For instance, if you have an InterLink DX controller, follow these instructions for it.Finally, as examples, detailed setup instructions for the InterLink® DX simulator controller and older versions of the InterLinks are here.
This guide walks you through your initial setup of FS One 2022e. You will need a computer that meets the system requirements, plus a compatible USB joystick game controller. The simulator will work with a wide range of controllers, and the setup can be quick or more involved depending on what controller you want to use (e.g., real RC transmitter, InterLink® simulator controller, TacCon™ simulator controller, etc). Using an RC transmitter or RC simulator controller is recommended.
Reading these instructions is required to be successful running FS One. These instructions describe how to setup your controller so that it can be read properly by FS One. That one step will make your controller work with all airplanes in FS One.
Tip: How to Navigate this User Manual
This first Part I chapter covers the installation of FS One and your selection and setup of a controller.
Part II covers how you calibrate your controller in FS One and run the simulator. Some setup tips are included.
Part II also describes using the additional FS One Power Tools app that unlocks additional useful features of FS One.
The Main Menu chapter covers the layout of the top-level menus in FS One.
You can use the rest of this manual as a reference guide. Most of it you can ‘learn-by-doing’, but do not skip the section on Key Commands. That includes the key bindings that are essential when in a flight session. Nearly every keyboard key controls something when you’re flying.
1.1. PC System Requirements#
Windows 7 or Higher
Most PC’s that can run games should be able to run FS One. The best option is to use a PC that has a dedicated graphics card from NVIDIA® or Radeon®, but FS One will also run on some HD Graphics (Intel 620 or better). Before you begin, update your graphics card drivers. FS One requires around 4.2 GB of free disk space to install. While FS One requires Windows®, it will run on Macs in Windows virtual machine environments. FS One Version 2022e does not use Steam, does not require registration, and only connects to the Internet when you click help from inside FS One.
Compatible Controller
You will need a compatible controller to use FS One. Supported controllers include RC transmitters, RC simulator controllers, the FS One TacCon controller as well as some game controllers.
Plug in your controller (USB interface) before starting FS One. Otherwise your controller will not appear in the list when you run FS One.
1.2. 100% Font Magnification, 4K Monitors, Etc#
Option 1: FS One needs to run with a Windows Control Panel the setting: “Display -> Scale and Layout” set to 100%. For most people, this Windows Control Panel setting will already be selected. From the Windows Control Panel, look for “Display” and then “Scale and Layout”. Set your computer to run at 100%, or else the mouse will be offset and you will not be able to interact with FS One. Making the change takes 2 sec each way (there and back), i.e. easy and quick.
Option 2: There is another approach, which is better if it works for your system. See the first item in the troubleshooting section. It relates to customizing the DPI scaling behavior for the sim.
1.3. Graphics Card Drivers#
FS One uses OpenGL for its graphics. Ensure that your graphics drivers are up to date. So before you begin, visit the website of your graphics card maker and install the latest updates.
1.4. Download FS One#
FS One is now SeligSIM 2024
If you are going to download the latest version of the simulator,
it is now SeligSIM 2024 after the name change. You can download this
new version from the new site and user manual below:
https://www.seligsim.com
https://www.seligsim.com/manual
Obtain FS One from only trusted sources. Dropbox is the main official source being used for delivery:
Download the main installer file (ISO file) and update file (exe). The main installer file will install the base FS One 2022a, and the update file will install the latest version, which is 2022e.
A second download source is the FS One page on the Internet Archive:
You do not need a Dropbox or Internet Archive account to download the files.
The Dropbox link includes the base installer (ISO file), the current update, and extras - Downloadable Content packs (DLCs).
The Internet Archive link only includes the base installer (ISO file) and current update.
1.5. Software Updates and DLCs#
FS One 2022e does not check for updates and does not use Steam. The two best ways to hear about new and upcoming releases are through the FS One newsletter and the @MichaelSelig YouTube channel.
1.5.2. YouTube Channel#
Also, FS One software update notices and new flight/physics videos will be uploaded to YouTube.
To stay up-to-date, subscribe and click the bell icon for:
1.5.3. Updating#
The current update is downloaded and installed directly by you.
Install the update as Administrator.
You can install FS One on any number of PCs, and there is no serial number to use.
FS One does not require registration or a login.
It does not save your “in-game” use information to the cloud.
It only connects to the Internet when you click for help from inside FS One.
Clicking help from inside FS One goes directly to the User Manual topic that you selected.
1.6. Installation#
The base simulator (2022a ISO file), the current update (2022e exe), and any DLCs (exe’s) all need to be installed as Administrator.
As an overview, the recommended install sequence is to first install the main program (2022a), and then run the sim one time. You can test the install by clicking on the Flight Training button and playing a lesson. Exit the sim and then install the latest update (2022e). Run the sim again. Exit and install any DLCs. After each of these steps, running the sim one time is only ‘confirmatory’, i.e. you can see it works. But running after each incremental install is not necessary.
To install FS One, your downloaded 2022a ISO file can be mounted as a virtual drive on your PC, and the simulator can be installed from that virtual drive. If your computer is unable to mount the ISO installer file, then use a DVD writer to write the ISO file to a DVD and install directly from the DVD that you create. If your computer does not have a DVD drive, use an external DVD drive that connects to your PC. (External DVD drives are cheap and readily available. They connect via USB to your computer.)
Along with the tips above, here are the steps:
Close all applications before installing FS One. (This is not really required, but it is good practice.)
Mount the ISO file. Use mouse right click to select “Mount.”
Click on the mounted folder (“DVD Drive … FSOne …”).
Find the installer file (exe). Right click on the installer file and make the selection to “Run as Administrator.” Always install FS One, the current update, and any DLCs as Administrator.
After installation, right click on the mounted drive and select “Eject.”
Next, download and install the current update as Administrator.
[If you do not install FS One (plus the current update and each of the DLCs) as Administrator, the simulator will not run properly, e.g. it will not have all airplanes, will not let you copy/edit airplanes, will not save your calibration data between sessions, etc.]Before using FS One for the first time, setup your controller and test it in the Windows Game Controller gadget as described in the next section.
Finally, do not assume that you can successfully run FS One without reading the rest of these instructions. The simulator does not tell you how to setup your controller. The proper setup is only described in these online instructions.
FS One V1, V2, and 2022, etc on the Same Computer
All versions of FS One can be installed on the same computer without conflict. The different versions do not share files.
1.7. Selecting Your Controller#
A controller for FS One is generally speaking a USB joystick input device or USB simulator controller. It is also generically called a “USB Interface”. When connected and powered, the controller will appear as a joystick in the Windows Game Controller gadget (found in the Windows Control Panel), i.e. this Windows Game Controller gadget:

Windows Game Controller (joy.cpl) started from the Windows Control Panel.#
For any given controller selected from the list, if you then click on “Properties,” you will see the axes (and buttons and hat controls if available) for that controller, e.g. as shown below for the “FS One v2 2048” USB interface. The sliders will move with your control inputs. If your game controller has buttons and other functions, the properties display (“Test” tab) can be more elaborate than this example below.
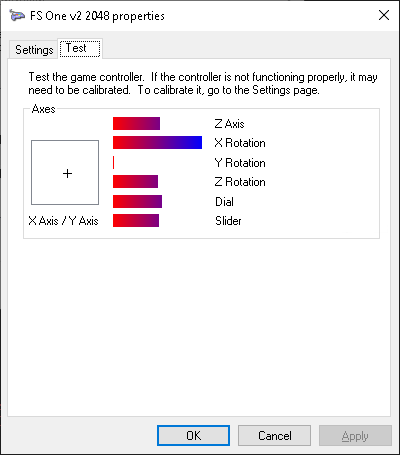
Windows Game Controller Properties (joy.cpl).#
If you have a controller that has this behavior (i.e. works as a named USB joystick, appearing in the list), you should be able to make it work with FS One by following the appropriate set of instructions that apply for your situation.
vJoy Device
Note the controller named vJoy Device in the list of game controllers above. This joystick device plays a key role in setting up FS One for use with any general RC transmitter. It is discussed in detail below, and the discussion may apply to your situation, i.e. how you will use FS One.
P3/Android/PC360 Gamepad
Some controllers may not respond in the Windows Game Controller gadget, yet they are properly seen by Joystick Gremlin, which is all that matters. In testing, one gamepad/controller labeled “P3/Android/PC360” behaved in this manner - worked in Joystick Gremlin and not with joy.cpl. If you have a controller like this (non-responsive with joy.cpl), test it directly in Joystick Gremlin.
Tip
You can launch the Windows Game Controller gadget from your Control Panel. Find your “Devices and Printers,” and then right click on your controller to select “Game controller settings.” Alternatively, you can type joy.cpl in your taskbar search box.
Joystick Setup (Your Equipment)
Here is a sample list of some joystick setups (equipment) that can be configured to work with FS One:
FS One V1 USB Interface: FS One V1 TacCon controller connected to the original FS One V1 USB interface named “Hangar9 FS One v1” or its companion second player interface named “Hangar9 2Player v1.” Included in this group is the FS One Solo USB interface named “FS One Solo v1.” These are out of production, but they can still be found used.
FS One V2 USB Interface: Various transmitters (including the V1 TacCon controller) connected to the FS One V2 USB interface named “FS One v2 2048” (as above), including the V2 variants with names “FS One v2” and “FS One v2 2048-2nd.” The connection between the transmitter and the USB interface requires a compatible FS One V2 cable. A limited supply of FS One V2 inventory is still available. Check https://www.fsone.com for availability.
RealFlight® InterLink® Controllers: InterLink DX, InterLink Elite, InterLink Plus, and InterLink.
RC Transmitters with PPM Output to a USB Interface: Any transmitter that outputs a PPM signal (or other protocol) that connects to your computer through a compatible USB interface and reports as a named joystick device on your computer, i.e. can be seen in the Windows Game Controller gadget like shown above. However, if you are using any variant of the inexpensive all-in-1 selectable-style USB interfaces, it may or may not work with FS One.
RC Transmitters with a Built-In Direct USB Joystick: Transmitters that connect to a PC and directly report as a USB joystick game controller. For instance, the new Spektrum NX series transmitters have a menu selection that allows you to set your NX transmitter in Game Controller mode (search the NX manual for “USB Settings”). Below, using this connection method is called “Approach 4” in this setup guide.
PC Game Controllers: Some have been tested and work with FS One. A game controller, however, is not recommended. Controllers that look like an RC transmitter and are designed for use with RC simulators are a better choice.
No matter your situation, reading the controller setup instructions in this User Manual is key to successfully running FS One with your controller. The setup can be simple or involved depending on your controller. The controller setup in FS One is not like other RC simulators. No two RC simulators are alike.
Using Real Transmitters (no programming)
If you are using an RC transmitter and want to get the best results (easiest and best way to start), a fundamental concept is to use your transmitter with no programming, no mix, no dual rates, etc. If your transmitter does not have programming capability (e.g. like the classic Hitec Laser 4 transmitter), you can ignore this paragraph. On the other hand, if your real transmitter is programmable with model memory, create a new “model” called, e.g. “FS One.” Then set that model to the original default settings for airplanes/acro (that is, again, on your real transmitter: use no flight modes, no mixing, no expo, etc.).
These simple default airplane settings are needed because FS One itself includes the necessary transmitter programming/setup (aka “computer radio”) that is unique for each airplane in the simulator. You can later copy and edit these FS One transmitter settings in the simulator if you want, but it is not necessary.
Using Real Transmitters (enable all/uninhibit none)
On some transmitters, it is necessary to “enable” or “uninhibit” specific channels on your transmitter. Beyond the always-enabled sticks (gimbals), you should allow all channels to function, i.e. flap knob, two-position switches, three-position switches - whatever capability your transmitter has. FS One will use up to 8 channels on your transmitter. Ideally, use an 8 channel transmitter that has, in addition to the sticks (4 axes), the following additional 4 functions enabled: one knob, one 2-position switch, and two 3-position switches. If your transmitter has less than the full 8 channels that FS One can use, those channels not present on your transmitter will be automatically assigned to keyboard keys and described in the Flight Manual on this site. Thus, no functionality of the simulator is lost, even if you are using only a basic 4 channel transmitter.
1.8. Setting Up Your Controller#
1.8.1. Standard Axes Order#
The image below shows part of the transmitter screen in FS One and the axis assignments on the right. The ordering of the axes in this image is the standard axes order that all airplanes use in FS One.

Standard axes order in FS One.
Screen shot cropped from the Transmitter Selection window.#
If you move your aileron stick on your transmitter and the top slider moves, then you have the proper mapping for that axis. If you move your elevator and the second slider moves, then again you have the proper mapping for that axis, and so on.
A slight complication, however, is that simply plugging in any USB game controller is likely not going to map as described above. To get the right order for FS One, i.e. to get the standard axes order, the axes must be remapped so that the order of the axes follows the standard order above.
Approach 1: For the original FS One interfaces (V1 and V2), the axes inside FS One are programmed to follow the standard axes order. FS One reads the USB name and “knows” how to configure its own interfaces and how to instruct you to calibrate them.
Approach 2: Use an InterLink controller. The axes are not remapped by the simulator. Instead, the remapping to the standard axes order is done using an external program (Joystick Gremlin) that runs along side FS One, i.e. you run both programs at the same time.
Approach 3: Use a real RC transmitter with PPM output to a USB interface (non FS One brand) or a transmitter that can operate as a USB joystick. The axes are not remapped by the simulator. Instead, the remapping to the standard axes order is done using an external program (Joystick Gremlin) that runs along side FS One, i.e. you run both programs at the same time.
Approach 4: There is another approach. If your RC transmitter has channel/Rx port remapping features and can operate directly as a USB joystick device with 8 axes shown on the PC, then the transmitter’s axes can be programmed in the necessary FS One axes order, i.e. the standard axes order (per image above and as well as below). If your transmitter shows a USB joystick with less than 8 axes in the Windows Game Controller gadget, then use “Approach 3” above. With some Spektrum radios (e.g. DX9, NX6, NX8, NX10), this remapping feature is found in the menu under Channel Assign and then Rx Port Assignments. For radios using OpenTX, this remapping is done via the programmable mixing.
Below, setup guides for the FS One V1 and V2 interfaces are first described. If you are using some other interface, skip down to the section that describes setups for other controllers.
Informational
In the image above the axes are numbered 1 through 8 from bottom to top. When running the simulator, the axes are actually numbered 0 through 7. It makes no difference. The ordering of the controls is the same.
1.8.2. Setups for FS One V1 & V2 Interfaces#
As described above, FS One is more or less Plug-and-Play when using the FS One V1 and V2 USB interfaces for the cases below:
If you are using the TacCon controller with a V1 or V2 USB interface check that all 8 sliders move in the Windows Game Controller gadget. The TacCon is self-powered through the USB connection and does not use batteries.
If you are using an RC transmitter with the V2 USB interface, then follow these steps:
Enable your transmitter trainer port and set the output to PPM.
Make a model in memory with settings as described above (no mix, no expo, etc).
Make the connection between your transmitter and your computer using the FS One USB interface and compatible FS One cable.
If you are using a JR/Spektrum® transmitter, leave the transmitter turned OFF. When you connect the FS One USB cable to your transmitter, the transmitter will turn ON.
Run the Windows Game Controller gadget to confirm your connections. The sliders should move in response to your inputs. Next, with your RC transmitter in hand, determine which controls on your transmitter move the sliders in the Windows Game Controller gadget. Whatever number of sliders in the Windows Game Controller gadget, those sliders that are there should move with your transmitter sticks, switches, etc. If not, ensure that you have enabled all appropriate control functions on your transmitter as mentioned above. Further, ensure that you have selected the model that you created in memory.
Using the V1 interface with an RC transmitter is not presently supported, unless it is an 8 channel transmitter. If so, follow the V2 instruction above.
1.8.3. Setups for Other Transmitters/Controllers with vJoy#
All of the setup instructions in this current section (1.6.3) have one common outcome. It is to take your transmitter/controller sticks (plus a varied collection of switches, knobs, sliders, and buttons) and transform those into a controller with 8 axes in standard axes order.
This transformation to the standard axes order is implemented with two general-purpose external programs (not part of FS One). The first program, vJoy, is run once to make a virtual joystick named vJoy Device. Windows, and any program like FS One, thinks that this virtual joystick is an actual real transmitter/controller joystick device with sticks, knobs, etc, even though it’s only a joystick in software. After you create it, it is viewable in the Windows Game Controller gadget as vJoy Device. When it is first installed, it will appear to be doing nothing (i.e. sliders won’t move, etc). The magic happens in the next step.
The second program, Joystick Gremlin, remaps your actual transmitter/controller to the vJoy Device (thereby ‘activating’ it). The remapping inside Joystick Gremlin will output the axes in the standard axes order after you complete the remapping steps (instructions below). More specifically, Joystick Gremlin specifies the virtual joystick’s behavior via remapping, and it does this in terms of the controls on your real transmitter/controller. Joystick Gremlin is outrageously flexible in allowing you to define the remapping. For instance, each of the following functions can be made to imitate any of the others: three-position switches, momentary buttons, self-centering joysticks, non-self-centering knobs, keyboard keystrokes, and more. Inevitably, such flexibility means that using Joystick Gremlin can be daunting at first. But the step-by-step instructions here are carefully laid out in the setup guides, with plenty of places along the way where you can check your progress.
Below is a list of setup guides for the InterLink controllers (a few), real transmitters (e.g. the Spektrum NX10), and a specific gamepad. The latter is just an example of how to use a gamepad (Logitech), so your Joystick Gremlin steps could be a little different with a different gamepad.
With your transmitter/controller in hand, follow the instructions for your transmitter/controller. Upon completion, your transmitter/controller together with Joystick Gremlin (running and activated in the background) will result in a joystick device (again, named vJoy Device) that has the standard axes order that FS One requires, allowing you to fly every airplane in FS One without any further adjustments or setup – all 140 airplanes.
All of the instructions below apply to a Mode 2 transmitter stick arrangement, which is the most common (throttle on left stick). For other Modes, the remapping of the main gimbals (sticks) will have to be adapted.
Setups for InterLink Simulator Controllers
Connect an InterLink DX (G9)
This is the best USB simulator controller available and recommended. Made by Spektrum and distributed with RealFlight®.Connect an InterLink Elite (G4-G7)
These controllers were supplied with earlier versions of RealFlight. The controllers were made by Futaba and hold up well. Used versions are easy to find. Versions (G6/G7) with the flap knob on the front right face are newer than ones (G4/G5) with the flap knob on the top right shoulder.Connect an InterLink Plus (G3)
The quality of this InterLink version is a notch below the Elite version, but it functions equally well with FS One.Connect an InterLink (G2)
These instructions are for the first InterLink controller sold with RealFlight. The instructions are similar to the InterLink Plus above. The difference is that model reset in FS One must be controlled using the keyboard.
More Setups for USB Simulator Controllers
Connect a Detrum/Dynam Simulator Controller (or similar) (4, 6, and 8 ch examples)
This is a useful guide that can be applied to a great number of USB simulator controllers.
Setups for RC Transmitters with Built-In Game Controllers
Connect an Spektrum NX10
Using your real transmitter is the best way to use FS One. As with many high-quality modern transmitters, the Spektrum NX series has a built-in native USB game controller mode, which bypasses using a traditional USB interface. A micro USB cable is required to make the connection to your computer. The principles described in this setup will transfer over to setting up other transmitters that report as having a full 8 axes in the Windows Game Controller gadget. Note that while the NX series has channel reassignment features, this guide does not use that. Instead it uses vJoy + Joystick Gremlin.Connect an FrSky Taranis X9D Plus
When powered ON and then connected to a USB mini B cable, the Taranis can be set to USB Joystick mode, making a direct connection as a game controller. This guide describes the setup for a full 8 axes case. Note that while OpenTX transmitters have channel reassignment features (called “mixing” in OpenTX), this guide does not use that. Instead it uses vJoy + Joystick Gremlin.
Setups for Transmitters with a Wireless Connection
Connect a Wireless Spektrum DX8
This guide describes the setup for a Spektrum DX8 transmitter bound to the Spektrum Wireless USB Dongle (USB interface). The Spektrum wireless part is SPMWS2000 and it supports 8 channels. All 8 channels of the DX8 are used in this guide.
Setups for RC Transmitters with Trainer Port/DCS (PPM) Output to a USB Interface
The best way to connect through the trainer port is to use the FS One V2 interface designed exclusively for use for FS One. It is sold directly by InertiaSoft (FS One). Contact us for details: contact@fsone.com.
Another method is to use one of the all-in-1 (9999-in-1) USB interfaces that are available through many outlets online. Follow one of the sample guides here to learn how to make the connection to FS One.
Connect a Hitec Laser 4 through a USB Interface
The Hitec Laser 4 FM radio can be connected to FS One using a USB interface that hooks up to the trainer port. The early RCJoy USB Interface is used. The radio and interface are from the early 2000’s. This is an example of bringing old equipment back to life, and how to hook up using only 4 channels. Beyond the 4 channels, the remaining FS One control inputs are done using the keyboard.
Setup for a Wireless USB Interface
See the DX8 setup above. It more or less follows the instructions for setting up a regular RC transmitter, such as the NX10, or Hitec Laser 4 above.
Setup for a PC Game Controller
After you follow one of the guides above and have remapped your controller, return to this point in Part I. Read the remainder of this chapter and then continue on to Part II. At any time, revisit this section of Part I (below) if you want to confirm your axes order.
1.8.4. Setups for Transmitters without vJoy#
If you are taking “Approach 4”, use your transmitter to order the joystick axes per image below. The right side (blue sliders) is a screen shot cropped from the Transmitter Selection window.
1.8.5. Final Axes Order and Direction#
Check your final axes order and directions (see figure below).
In each case, all of the above guides involving using the external
program, Joystick Gremlin, or your transmitter directly (“Approach 4”)
result in the following mapping (see
image below showing the standard axes order). The lower left axis
sliders are from Joystick Gremlin. Further, note that this
graphic shows the proper axis direction for each function. For
instance, full left aileron stick corresponds to the Joystick Gremlin (left insert, axis 8) slider being all the way down. In the
simulator it is all the way left, and so on - you can confirm each
axis using full stick throws, full knob (flap), and full switch/button
positions. If an axis needs to be reversed, it can be done inside the
transmitter (if able) or using Response Curve -> Invert for the
axis in Joystick Gremlin (e.g. see this example).
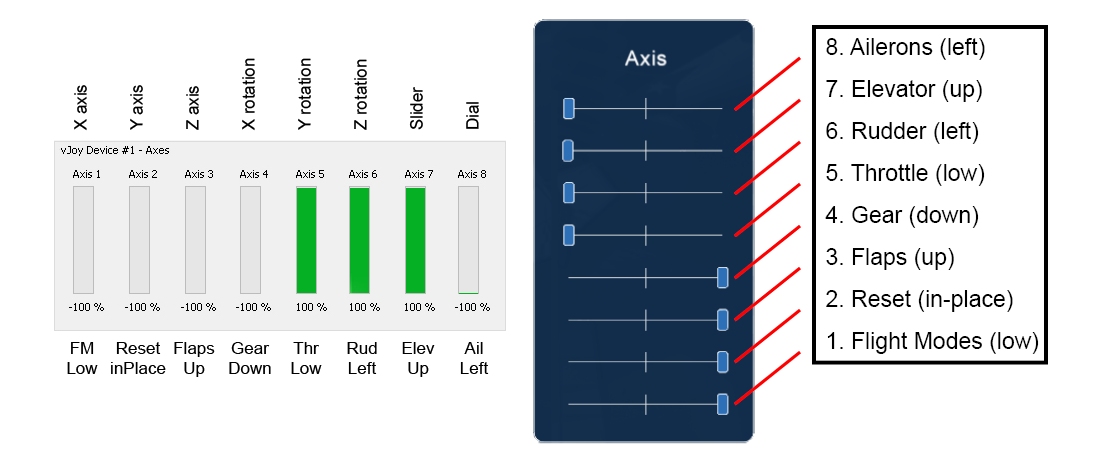
Corresponding vJoy axes at left.
Click image to enlarge.
1.8.6. Axis Priority for New Setups#
If you are setting up a controller that does not quite follow one of the samples above, it is important to understand axis priority. Clearly, if you have a 4 channel radio, you will map that to ailerons, elevator, rudder, and throttle. But what if you have a 5 channel radio to map? What are the allowable distributions of controls? The table below shows the normal setups for 4 through to 8 axes. If you have a 5 channel radio to setup, the first four channels will map to ailerons, elevator, rudder, and throttle. But what happens to the 5th channel? Out of the remaining gear, flaps, resets, and flight mode functions, does any one of them take priority? Yes. Gear takes priority over the other three. The priority goes: Gear, Flaps, Resets, and Flight Modes. Following this approach, the setups are shown in the table below.
Control Inputs |
FS One Function |
4 Ch |
5 Ch |
6 Ch |
7 Ch |
8 Ch |
vJoy Axis |
|---|---|---|---|---|---|---|---|
Right Stick |
Ailerons |
x |
x |
x |
x |
x |
8 |
Elevator |
x |
x |
x |
x |
x |
7 |
|
Left Stick |
Rudder |
x |
x |
x |
x |
x |
6 |
Throttle |
x |
x |
x |
x |
x |
5 |
|
2-Pos Switch |
Gear |
x |
x |
x |
x |
4 |
|
Knob, or 3-Pos Switch |
Flaps |
x |
x |
x |
3 |
||
3-Pos Switch |
Resets (Home and In-Place) |
x |
x |
2 |
|||
3-Pos Switch |
Flight Modes |
x |
1 |
||||
Deviations from the above are allowable. You can violate axis
priority and use setups different from the table above. For instance,
the Resets can be skipped. Then, the working vJoy axes will be:
876543x1 (nothing mapped to axis 2). Resets can be triggered using the keys
Spacebar and U for Reset-To-Home and Reset-In-Place, so
there is no loss of function. Suppose you had a 6 channel radio and
wanted to only fly an airplane that did not have flaps and you were
planning on using the keyboard for resets. But, say, you really wanted
to be able to control the Flight Modes with your controller. Then you
could create a mapping (Profile) in Joystick Gremlin that only remaps to
vJoy axes: 87654xx1. For flaps in this case, FS One will
calibrate the flap axis to be neutral (flaps centered). While this will be
perfectly fine for an airplane like the SIG FourStar 60 that does not
have flaps, if you flew an airplane that had flaps, then the flaps will
be fixed in the middle between full and no flaps, i.e. you will see half
flaps. Thus, for vJoy axes not assigned to a control (not mapped) and
not following the axis priority approach, those axes will simply
calibrate to the center position when you calibrate in FS One.
Except the Resets function is a special case that is ignored if not
calibrated, allowing you to use the keyboard instead. Flaps on the
other hand are different. If skipped, they will be fixed at half flaps
and the keyboard controls will not override that in this example.
1.9. Next Step#
Continue to Part II to run FS One. If needed, refer back to this Part I to check your axes order.