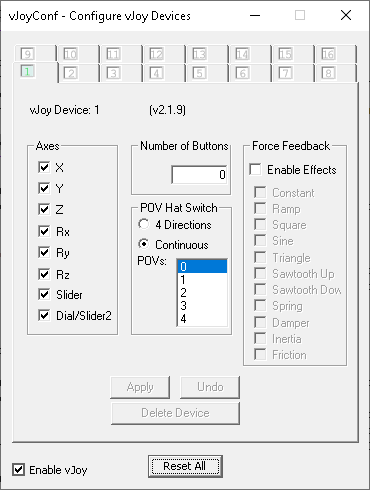
You set up vJoy (image below) one time. This completes your vJoy Device setup.
vJoyConf configuring a virtual joystick with 8 axes, 0 buttons, and 0 hat switches.
This is vJoy Device #1 indicated by the light green tab labeled “1”.
Remaining Instructions
The remainder of these instructions include using Joystick Gremlin
to remap your controller inputs to vJoy.
As with the instructions for the Logitech gamepad,
aileron is commanded by axis 8 ( Dial ),
elevator by 7 ( Slider ),
rudder by 6 ( ZRotation ), and
throttle by 5 ( YRotation ).
If your controller has two joysticks, use the Logitech instructions.
If your left joystick’s vertical motion is not self-centering
(as is common with R/C controllers), simplify the instructions for
throttle to be like those for the other three axes.
If you have only one joystick, use it for aileron and elevator,
because those are commanded more often than rudder and throttle.
Relegate rudder and throttle to more primitive inputs: knobs, sliders,
switches, or a set of buttons. (Don’t dismiss that idea! The dawn of
radio control used even more primitive inputs: dialing a 3 on a rotary
telephone dial commanded left rudder, say; dialing 9 might command
full throttle. Even more extremely, repeatedly pressing one button
might do everything, cycling through a fixed order of commands such as
right rudder, up elevator, left rudder, etc. You just had to time the
commands well.)
To connect a knob or slider to one of these axes, use the same steps as for
a joystick; but of course start by wiggling that knob instead of
wiggling something else.
To connect a two- or three-position switch to one of these axes,
work by analogy from the Interlink DX’s instructions
“Map the top left (2-position) switch to vJoy axis 4” or
“Map the top right 3-position switch to vJoy axis 1.”
To connect a set of buttons to one of these axes is more complicated.
First, choose which and how many buttons to use. Two lets you command
(say) up elevator and down elevator. Three lets you also command neutral
elevator. Even more would give you more intermediate values.
Pressing a button then “jumps” the axis to the corresponding value.
To do this, work by analogy from the Logitech gamepad’s instructions
“Map the diamond buttons to vJoy axis 1.”
Two buttons can be mapped to many intermediate values,
like the volume-louder and volume-quieter buttons on a pocket mp3 player.
But that loses instant tactile knowledge of the axis’s value,
and is thus tricky for flying.
Finally, you may of course connect nothing to one of these axes,
instead using a fixed value in the manner of 1920s “free flight”
model airplanes or 1930s rudder-and-throttle-only airplanes. The same
holds for the rest of this section. Flaps, retractable landing gear,
and flight modes may be left uncommandable in flight. The two reset
buttons can be operated from the spacebar and the U key.
In vJoy, axis 3 ( ZAxis ) commands the airplane’s flaps.
To connect a knob or slider to that,
use the Interlink DX’s instructions
“Map the knob to vJoy axis 3.”
To connect two buttons to flaps,
use the Logitech gamepad’s instructions
“Map the right shoulder buttons to vJoy axis 3.”
To connect more than two buttons,
work by analogy from the Logitech gamepad’s instructions
“Map the diamond buttons to vJoy axis 1.”
To connect a 2-position switch to vJoy axis 4 ( XRotation ),
work by analogy from the Interlink DX’s instructions
“Map the top left (2-position) switch to vJoy axis 4.”
To connect a 3-position switch to vJoy axis 1 ( XAxis ),
work by analogy from the Interlink DX’s instructions
“Map the top right 3-position switch to vJoy axis 1.”
Even if you’re lucky enough to have more than two joysticks,
it’s best to not use them to emulate switches and buttons,
because physical switches and buttons have unmistakable tactile feedback.
These axes are for flight modes and for retractable landing gear.
To connect a 2-position switch to vJoy axis 4 ( XRotation ),
use the Interlink DX’s instructions
“Map the top left (2-position) switch to vJoy axis 4.”
To connect two buttons to vJoy axis 4 ( XRotation ),
use the Logitech gamepad’s instructions
“Map the left shoulder buttons to vJoy axis 4.”
To connect a 3-position switch to vJoy axis 1 ( XAxis ),
use the Interlink DX’s instructions
“Map the top right 3-position switch to vJoy axis 1.”
To connect three buttons to vJoy axis 1 ( XAxis ),
use the Logitech gamepad’s instructions
“Map the diamond buttons to vJoy axis 1.”
Axis 2 ( YAxis ) is for the Reset button and the Reset Plus button.
Pressing one button sets that axis to 1.000; pressing the other, -1.000;
releasing both, 0.000.
To connect two buttons to this,
Use the Logitech gamepad’s instructions
“Map two hard-to-reach buttons to vJoy axis 2.”
Do not connect knobs, switches, or joysticks to this. If you forget
that one of those is “on,” the airplane will obstinately sit there and
ignore any other commands.