Using a wireless dongle/interface is perhaps the most convenient way
to use FS One. This guide describes the setup for a Spektrum
DX8 transmitter bound to the Spektrum Wireless USB Dongle (USB
interface). The Spektrum wireless part is SPMWS2000 and it supports 8
channels. All 8 channels of the DX8 are used in this guide.
As described below, Joystick Gremlin will be used to create a
remapping. Joystick Gremlin forwards your control inputs to vJoy which
is what you will select as your USB interface in FS One 2022e.
If you have already installed vJoy, installed Joystick Gremlin, and made
a virtual joystick, then skip the block below and start with
making a model in memory on your transmitter.
Install vJoy
This makes a virtual joystick for FS One (or for anything else).
Unplug all USB gamepads, joysticks, TacCon, and other “R/C” controllers.
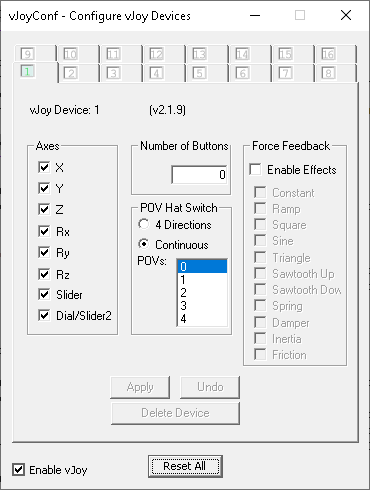
You set up vJoy (image below) one time. This completes your vJoy Device setup.
vJoyConf configuring a virtual joystick with 8 axes, 0 buttons, and 0 hat switches.
This is vJoy Device #1 indicated by the light green tab labeled “1”.
Remaining Instructions
The remainder of these instructions include using Joystick Gremlin
to remap your controller inputs to vJoy.
Turn ON your Spektrum DX8, and create a new ‘Acro’ (airplane) model in
memory. For wing/aircraft type, use the defaults for “normal” wing
and tail so that ailerons, elevator, and rudder are each driven by one
servo (one channel which will be one axis).
Name your model in memory something like “FSONE WL” (WL for
wireless). It will
create a model with these functioning controls seen in the monitor. The
ordering below is how they appear on the transmitter monitor screen.
The vJoy axis numbers are the final outcome after remapping.
Spektrum DX8
Control Inputs
Monitor
FS One Function
vJoy Axis
mapping
Sticks
THR
Throttle
5
Sticks
AIL
Ailerons
8
Sticks
ELE
Elevator
7
Sticks
RUD
Rudder
6
2-Pos Switch (“GEAR”)
GER
Gear
4
3-Pos Switch (“FLAP GYRO”)
AX1
Reset-To-Home / Reset-In-Place
2
3-Pos Switch (“AUX2 GOV”)
AX2
Flight Modes
1
Knob (“AUX3”)
AX3
Flaps
3
Do not create any mixes, expo, dual rates, etc. You will use the
programming (“Computer Radio”) inside FS One.
Follow the instructions that came with the Spektrum WS2000 to connect
your transmitter wirelessly to your PC. Confirm your connection by
running the Windows Game Controller gadget, which should show the
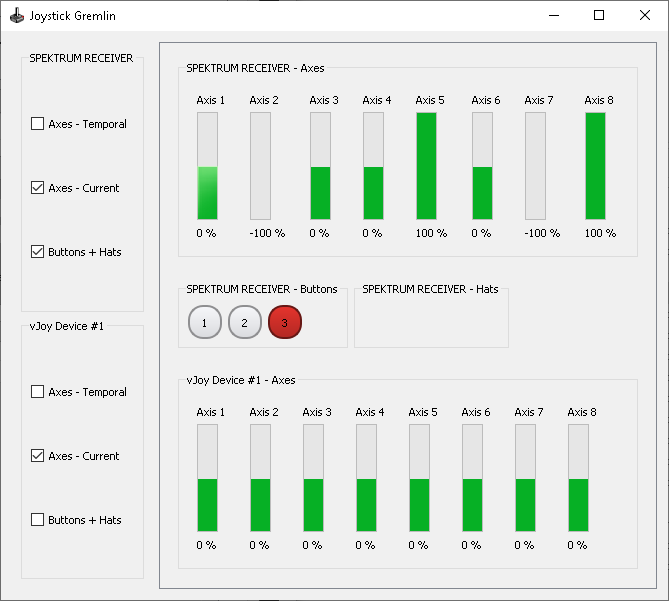
screens below. The WS2000 reports as the name: “SPEKTRUM RECEIVER”.
In the properties window, all sliders should move in response to your
inputs with the controls listed in the table above. The buttons will
not be used here.
JG’s top row has tabs for USB controllers, your keyboard, and the vJoyDevice#1 that you created. Generally, the USB controllers are the
inputs to the output that is the virtual joystick vJoyDevice#1
which is used by FS One. The keyboard appears, but it will not
be used here. Other USB controllers will appear if you have others
plugged into your computer. Disconnect any extraneous USB controllers
for this setup.
Tip
When you are finished remapping, follow these steps to use the controller:
In Joystick Gremlin, click the gamepad icon to change it from black to green so that Joystick Gremlin
is Activated. Use JG’s
Tools->InputViewer to confirm that your inputs are going to the vJoy Device joystick
as you expect.
When running FS One, select the vJoy Device virtual joystick that you created.
Do not select the SPEKTRUM RECEIVER.
Before running FS One, it is recommended that you run the Windows Game Controller gadget
to see that vJoy Device is indeed active, responding to your controller inputs.
Each section below remaps a single control to one axis for FS One, starting with Ailerons.
First, you move a control to select an input.
It will gray highlight on the left side of JG’s main window.
Then you will define where that control is mapped using the right side of JG main window.
Then you can test each axis mapping with the JG-viewer window to see that it is correct.
To create your remapping to the standard axes order for FS One,
these steps are performed in JG’s main window.
To start, the JG gamepad icon should be black (not green).
If it is green, click on it.
In JG’s main window, click on the tab: SPEKTRUMRECEIVER .
The left side of the window lists the SPEKTRUMRECEIVER axes and
buttons being driven by your Spektrum DX8.
The last moved axis or button will be highlighted gray.
The right side shows what each axis and button does (what will define the remapping).
This right side is initially blank.
The left side’s labels for the axes (e.g., X Axis, and so on) are
the Windows terminology for joystick axes and buttons and not meaningful to FS One.
Yet, the left side names will be used in the instructions here.
Map the Aileron Stick to vJoy Axis 8
First you may need to move the sticks around to ‘wake-up’ the main
JG window. It can go into a “sleep” mode.
Again, the last moved axis or button should highlight gray as you move each control input.
Move the aileron stick (conventionally, for Mode 2, the right stick, horizontally).
In JG, the left side’s highlight jumps to ZAxis .
On the right side, into Action Description type “Ailerons”.
On the right side, next to the first dropdown (it will have Remap selected), click Add .
Inside the gray Remap box, change the lower dropdown from XAxis to Dial (vJoy Axis 8).
Below the Remap box, change the dropdown Remap to ResponseCurve . Click Add .
Within the Response Curve box, click on Invert to reverse the axis.
See image below. Click to enlarge.
Test your mapping:
At top left, click the JG gamepad icon (“Activate”) to change it from black to green.
Move the aileron stick.
Now JG-viewer’s vJoy Axis 8 reacts to that movement.
Your first axis remapping is complete.
Click the JG gamepad icon to make it black again.
Click to make it green to review your mapping at any time.
This screen shot below also shows results of the remaining instructions. Click for full size image.
Map the Elevator Stick to vJoy Axis 7
Move the elevator stick. The left side’s highlight jumps to XRotation .
On the right side, into Action Description type “Elevator”.
On the right side, next to Remap , click Add .
Inside the gray Remap box, change the lower dropdown to Slider (vJoy Axis 7).
Below the Remap box, change the dropdown Remap to ResponseCurve . Click Add .
Within the Response Curve box, click on Invert to reverse the axis.
Map the Rudder Stick to vJoy Axis 6
Move the rudder stick. The left side’s highlight jumps to XAxis .
On the right side, into Action Description type “Rudder”.
On the right side, next to Remap, click Add .
Inside the gray Remap box, change the lower dropdown to ZRotation (vJoy Axis 6).
Map the Throttle Stick to vJoy Axis 5
Move the throttle stick. The left side’s highlight jumps to YAxis .
On the right side, into Action Description type “Throttle”.
On the right side, next to Remap , click Add .
Inside the gray Remap box, change the lower dropdown to YRotation (vJoy Axis 5).
Below the Remap box, change the dropdown Remap to ResponseCurve . Click Add .
Within the Response Curve box, click on Invert to reverse the axis.
Controls Move Axes and Can Trigger Buttons
Note that with the Spektrum DX8-SPEKTRUMRECEIVER combination,
moving the controls (sticks, switches, knob) can move not
only an axis, but they can also trigger button presses, which are seen in
the JG-viewer window. When configuring the mapping, be sure to have gray
highlight on appropriate left side axis label (and not a button
label). You can manually click on the left side to highlight an
axis, but you can also highlight it by moving the Spektrum control
to a location where the highlight is on the left
side axis label (and not a left side button label).
Map the Gear Switch to vJoy Axis 4
Move the top left side 2-position switch labeled “GEAR”. The left side’s highlight jumps to YRotation .
(If it is not highlighted, see prior note: “Controls Move Axes and Can Trigger Buttons”.)
On the right side, into Action Description type “Gear”.
On the right side, next to Remap , click Add .
Inside the gray Remap box, change the lower dropdown to XRotation (vJoy Axis 4).
Below the Remap box, change the dropdown Remap to ResponseCurve . Click Add .
Within the Response Curve box, click on Invert to reverse the axis.
When the gear switch is pulled forward (toward you), the gear will retract.
Map the Flap Knob to vJoy Axis 3
Move the flap knob labeled “AUX 3”. The left side’s highlight jumps to Slider .
On the right side, into Action Description type “Flaps”.
On the right side, next to Remap , click Add .
Inside the gray Remap box, change the lower dropdown to ZAxis (vJoy Axis 3).
Below the Remap box, change the dropdown Remap to ResponseCurve . Click Add .
Within the Response Curve box, click on Invert to reverse the axis.
When the flap knob is turned fully CCW, the flaps will be retracted.
Map the Reset Switch to vJoy Axis 2
Move the front left 3-position switch labeled “FLAP GYRO”. The left side’s highlight jumps to ZRotation .
On the right side, into Action Description type “Reset”.
On the right side, next to Remap , click Add .
Inside the gray Remap box, change the lower dropdown to YAxis (vJoy Axis 2).
Below the Remap box, change the dropdown Remap to ResponseCurve . Click Add .
Within the Response Curve box, click on Invert to reverse the axis.
When the reset switch is up/middle/down, the model will reset-in-place/fly/reset-to-home, respectively.
Map the Flight Modes Switch to vJoy Axis 1
Move the front right 3-position switch labeled “AUX2 GOV”. The left side’s highlight jumps to Dial .
On the right side, into Action Description type “Flight Modes”.
On the right side, next to Remap , click Add .
Inside the gray Remap box, change the lower dropdown to XAxis (vJoy Axis 1).
When the flight mode switch is pulled forward (toward you), it will be
the “low” rates flight mode (and pushed away, “high” rates).
However,
the specific descriptor when running FS One does depend on the
airplane in FS one.
Save Your Work
From the menu, File->SaveProfileAs and give it a name, e.g. My-Spektrum-DX8-WS2000.xml .
After you have saved it once, you can File->SaveProfile at any time, of course.
Activate and Test
When the JG gamepad icon is green, the JG-viewer window should
show all vJoy axes reacting to your Spektrum controls defined above.
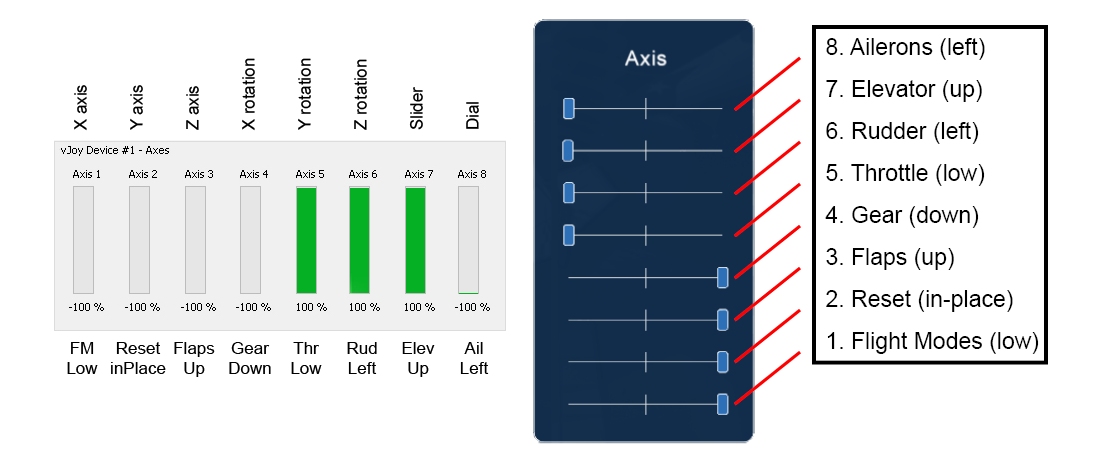
Finally, your Spektrum transmitter inputs mapped to vJoy should match the standard axes order
below which also shows the axis directions (via showing the result of
full stick, knob, and switch throws in the specific directions).
The mapping order, generally, was discussed here.
In this diagram, the “Axis 1” for vJoy is “1. Flight Modes” (“FM”) for FS One, etc.
When you finish this guide, return back to the last part of Getting Started: Part I to continue your
setup and run FS One.
Click image to enlarge.
Standard axes order in FS One with sliders at full deflections for the controls indicated.